
Before you get started, you may want to familiarize yourself with the Berkey systems, so you understand what you are trying to make. You will also want to know how to use your filters and prime them.
This is a great video to help you familiarize yourself with a Berkey
You will also need to know how many filters you want to use and if you will use the white Berkey Fluoride Filter in conjunction with the Black Berkey Filter.
Berkey filters come in packs of two, and there are two types:
- Black filter – NECESSARY
- Fluoride filter – OPTIONAL
YOU WILL NEED TO DETERMINE WHAT AND HOW MANY FILTERS TO USE
Watch these videos on how to install the Black Berkey filter and the white Fluoride Filter. This will help you determine how many holes you will drill.
How to install and prime the Black Berkey Filter
How to install and prime the white Berkey Fluoride Filter
BLACK BERKEY FILTER
The Black Berkey Filter will clean approximately 3,000 gallons of water. If you choose to use two Black Berkey Filters, your system will be able to clean 6,000 gallons of water.
If you only use one Black Berkey Filter, you will only drill one hole. If you want to use both Black Berky filters, drill two holes.
You could also consider making two separate systems and using one filter for each DIY Berkey. Or, keep the second filter on hand as a backup.
BERKEY FLUORIDE FILTER
If you choose to use the Fluoride Filter, you will NOT need to drill a second hole. The Fluoride Filter will attach to the bottom of the Black Berkey Filter and hang down into the Bottom Bucket.
The Black Berkey Filters fit into the base of the Top Bucket with the threaded stems of the filters protruding through the holes in the bottom of the Top Bucket.
The Fluoride Filters screw onto these threaded stems so that they hang down into the interior of the Bottom Bucket. The water flows from the upper chamber, through the Black Berkey Filters, into the Berkey Fluoride Filters, and then into the Bottom Bucket.
WHY WOULD YOU NEED THE BERKEY FLUORIDE FILTER?
Black Berkey Filters reduce Arsenic and Fluoride up to 99.9%. Typically carbon-based elements that reduce Arsenic and Fluoride lose that ability rather quickly. This is likely the case with Black Berkey Filters, which means that their efficiency at removing Arsenic likely declines before the 3,000-gallon expected lifespan of the Black Berkey Filter.
The Berkey Fluoride Filter can reliably remove Arsenic and Fluoride contaminants for up to 1,000 gallons, which is less than the 3,000-gallon life of the Black Berkey Filters. That is why they were designed to be replaceable!
The Black Berkey Filter’s job is to remove a wide variety of potential contaminants.
The Berkey Fluoride Filter’s job is to specifically remove Fluoride and Arsenic; contaminants that the Black Berkey Filters may begin to miss after extended use.
SHOULD I PRIME MY FILTERS WHEN I GET THEM?
That depends on when you plan on using them. If you are only planning on using this filtration system in an emergency, keep the filters in the original container and prime them when the emergency arises.
Unused, properly stored Berkey Fluoride Filters theoretically have an indefinite shelf-life. They must remain in their original packaging and be stored in a cool, dry, odorless place. They cannot be exposed to weather conditions.
Here is an easy way to prime your filters without running water.
If you are are going to save your water filters for emergencies only, you may not have running water to prime your filter. No worries! You just may have to get creative.
Watch this video for an idea of how to prime your water filter without running water.
If you are going to use your water filtration system daily, then yes, prime your filters now.
Now that you know what kind of system you want let’s make our DIY BERKEY FILTER.
DIY BERKEY FILTER
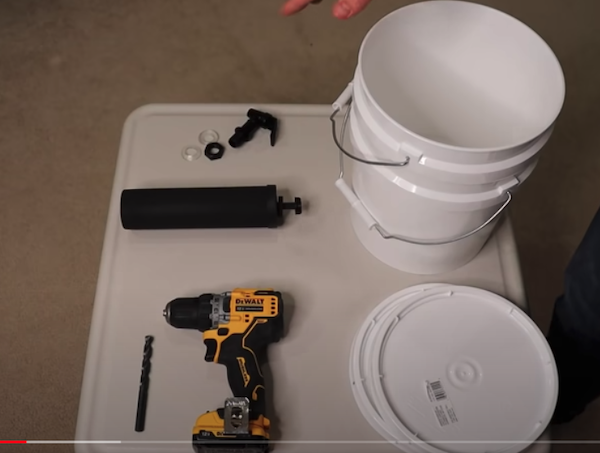
Materials You Will Need:
- Two (2) large, clean, food-grade buckets with lids
- One (1) Spigot
- Drill with ½” and ⅜” drill bits
- Black Berkey Purification Filters- NECESSARY
- Berkey Fluoride Filter – OPTIONAL
Step 1:
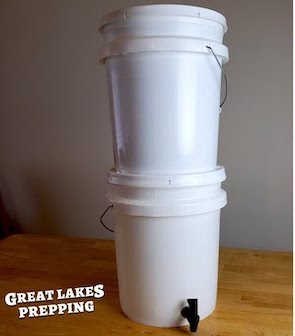
To begin, choose two large (identical) stackable buckets with lids that are food grade.
The Top Bucket will have holes drilled in the bottom.
The Top Bucket Lid will NOT be modified.
The Bottom Bucket will have a small hole drilled in the side for the spigot.
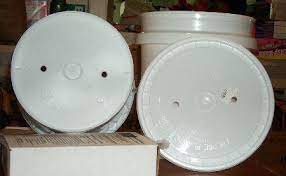
The Bottom Bucket Lid will have holes drilled that match the bottom of the Top Bucket.
Step 2:
Wash and dry the buckets entirely before using them.
Turn the TOP bucket upside down and then lay the BOTTOM bucket LID on top of the bottom of the bucket. This will ensure that your holes match up.
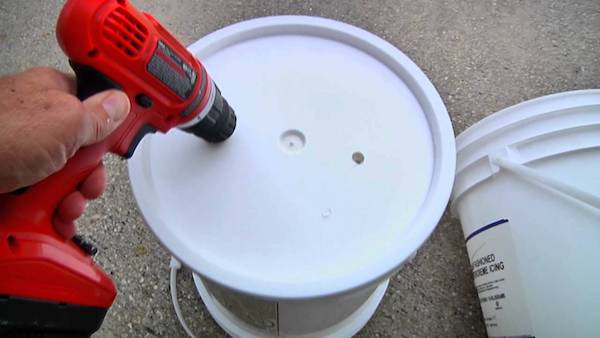
Drill one or two holes in the first bucket’s lid using the ⅜″ drill bit.
Step 3:
Drill a hole for your spigot in the Bottom Bucket and drill a ½″ hole near the bucket’s bottom.
Install the spigot by placing one washer outside the hole and another washer inside.
Step 4:
IF USING FOR EMERGENCY ONLY
Keep the filters in their original packaging and place inside the bucket for long-term storage.
Cover each component in large plastic bags to keep clean.
Review the installation procedure below for when you are ready to use your DIY Berkey.
WHEN YOU ARE READY TO USE YOUR BERKEY – GO TO THE NEXT STEP
Step 5:
Prime the filters
Watch the videos above on how to prime the filter.
Step 6:
Once the filers have been primed, they may be installed into the buckets.
Put the Black Berkey Filter’s stem through the opening on the bottom of the Top Bucket. Place the opening of the hole of the Bottom Buckets lid through the filter’s stem. Tighten the wingnut.
If you are attaching the Berkey Fluoride Filter, attach it to the bottom of the Black Berkey Filter. The Fluoride Filter will hang below the Top Bucket into the Bottom Bucket.

Here are some other examples and options for making your own Berkey filter.
Consider the following:
- You will need to eventually refill the bucket or container with water. The lid should be easy to remove.
- If you use a water bottle like the one shown below, you will need some kind of a funnel to prevent water loss when adding new water.
- If your water is coming from a river, water barrel, or other “dirty” source, you will want to place a cheesecloth or cotton filter on top of the bucket to catch any large debris before it goes into your DIY Berkey Filter.

Step 7:
Attach the assembly to the Bottom Bucket to complete the system.
DIY YouTube Videos on how to make a Berkey
WHAT IF YOU DON’T HAVE A FILTRATION SYSTEM?
There are other options if you don’t want to purchase a filtration system and you will want to know how to filter water using supplies you have in your home and yard.
WATER FILTRATION
We won’t go into all the scientific explanations, but it is good to have an understanding of how you can clean water. You may find yourself in a situation where you need to make a water filter without all the fancy materials.
This is a great article explaining how water filtration works and how it is accomplished on a large scale.
https://www.explainthatstuff.com/howwaterfilterswork.html
Bottom line, water filters use two different techniques to remove dirt: physical filtration and chemical filtration.
- Physical filtration is straining the water through a fine textile membrane, like cheesecloth or thin gauze.
- Chemical filtration passes water through an active material that removes impurities as they pass through.
EMERGENCY MAKESHIFT WATER FILTER
Here are the directions they have on their site:
Materials Needed:
- Plastic bottle or comparable food-safe container
- Another container for clean water
- Clean cotton or cheese cloth
- Coffee filter or porous cloth
- Charcoal
- Sand (fine and coarse)
- Gravel or pebbles
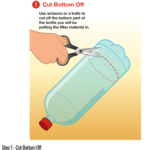
Step 1 – Cut Bottom Off
Use scissors or a knife to cut off the bottom part of the bottle you will be putting the filter material in.
Step 2 – Cut Drain Hole
Use scissors or a knife to poke a small hole in the cap. If there is no cap, cut off top of the bottle instead of the bottom for previous step then poke several small holes in the bottom of the bottle.
Step 3 – 1st Layer: Straining Fabric
Stuff the bottom of bottle with a fine cloth or paper fabric, such as a coffee filter, cheese cloth or cotton stuffing.
Sand and grass can also be used in this first stage. Fill the bottom with about 3 inches of grass clippings to filter out larger particulates and help give water a clean taste from chlorophyll contained in the grass. Then fill with 3-4 inches of very fine sand.
Be careful not to use poisonous or unidentified weeds when collect grass clippings. Do not use Highway Department sand, as it can be full of road salt and chemicals.
Step 4 – Break Up Charcoal
Take charcoal from campfire or BBQ charcoal (do not use match/instant light type because it’s soaked in chemicals) and use hammer or rock to break it down into smallest particles you can.
Step 5 – Layer 2: Pulverized Charcoal
Pour about 3 inches of pulverized charcoal into bottle. If available, cover with another coffee filter to prevent charcoal from being displaced to much during filtering.
Step 6 – 3rd Layer: Fine Sand
Add a 2-3 inch layer of the finest sand you can find. This and the subsequent layers you will add are to filter out particulates in the water.
Do not use Highway Department sand, as it can be full of road salt and chemicals.
Step 7 – 4th Layer: Coarse Sand
Add a 2-3 inch layer of coarse sand or very small small pebbles.
Step 8 – 5th Layer: Fine Sand
Add an additional 2-3 inch layer of the fine sand. Multiple varying filter stages (like a reverse osmosis system) ensures that most of the particles present in the water are caught.
Step 9 – 6th Layer: Gravel
Add a 2-3 inch layer of gravel or small rocks to prevent the water being poured in from displacing the sand.
Step 10 – Top Strainer
Cover top of filter with a piece of porous cloth, such as a bandana or cheese cloth. This step is optional but helpful in straining any large debris from the water and stop the pouring from displacing the sand inside the filter.
Step 11 – Pouring & Collecting
Pour water slowly into filter while holding it over the second container.
Make sure to wipe off or clean the collection container. Pour water slowly so as not to disturb filter layers too much or to cause filter container to overflow and possibly spilling unfiltered water into collection container.
Step 12 – Sterilize Water
Even though you have filtered the water through many different layers, microbes can still exist in the water and it still needs to be sterilized. Boiling the water in a pot or kettle is the easiest way.
You can also use sunlight to sterilize water. Pour filtered water into a clean, clear plastic or glass bottle up to 3/4 full and screw on cap. Shake for thirty seconds to add more oxygen to the water. Place on light or reflective surface in direct sunlight. The amount of exposure it needs it dependant on weather conditions. A clear day requires 6 hours of exposure whereas 50% or more cloud coverage will require 2 days of sunlight.
How To Purify Water
Water technically doesn’t go bad, but it can be contaminated. To keep your stored water as pure as possible, make sure it’s sealed and labeled. Make a note of when it was initially stored and what it has been treated with (like bleach).
Impurities are not always easy to detect, so being able to purify the water is a must. Here are several ways to purify water:
Bleach
Bleach is a great option for purifying water as most people keep bleach in their homes. Here are some things to consider:
- Only use regular, unscented chlorine bleach products. Bleach can start to degenerate after one year.
- Mark your bottles when you buy them with the expiration date.
- You may need to use more bleach if it is older than one year.
- If water is cloudy, let it settle and filter it through a clean cloth, paper towel, or coffee filter first.
- Use a clean dropper from your medicine cabinet or emergency supply kit to add bleach.
Use the table below to determine amount of bleach to use.
Below is the amount of bleach to use per volume of water as listed by the EPA.
| Volume of Water | Amount of 6% Bleach to Add* | Amount of 8.25% Bleach to Add* |
| 1 quart/liter | 2 drops | 2 drops |
| 1 gallon | 8 drops | 6 drops |
| 2 gallons | 16 drops (1/4 tsp) | 12 drops (1/8 teaspoon) |
| 4 gallons | 1/3 teaspoon | 1/4 teaspoon |
| 8 gallons | 2/3 teaspoon | 1/2 teaspoon |
Double the amount of bleach if the water is cloudy, colored, or very cold.
- Stir and let stand for 30 minutes. The water should have a slight chlorine odor. If it doesn’t, repeat the dosage and let stand for another 15 minutes before use.
- If the chlorine taste is too strong, pour the water from one clean container to another and let it stand for a few hours before use.
WATER PURIFICATION TABLETS
Water purification tablets are affordable and easy to find. These are made of chlorine dioxide and are found at any camping store. These should be used within 4 – 6 years if unopened. If opened, use within a year.
BOILING WATER
Boiling water is sufficient to kill pathogenic bacteria, viruses and protozoa (World Health Organization, 2015).
- Bring water to a roiling boil for at least one minute (three minutes if elevation is above 5000 ft).
- If water is cloudy, let it settle and filter it through a clean cloth, or coffee filter.
OTHER FILTERS
Filters can remove several impurities and parasites. Several options are available such as this one https://www.foodstoragedepot.com/aquabrick-water-purification-system/
Survival straws are popular because they are portable and allows you to drink directly from the source. https://lifestraw.com
Other Water Storage Resources

EMERGENCY PREPAREDNESS WATER SUPPLY
By now you should have a three-month supply of food and extra supplies at your fingertips. Now it is time to move to our second step, and that is storing water. STEP TWO – WATER STORAGE We can only survive for a few days without water. Dehydration can cause serious damage to our body and lead to death within 3-4 days. Water is the most important and necessary…

LONG-TERM WATER AND FILTRATION PREPARING FOR EMERGENCIES
WATER STORAGE AND FILTRATION We already know we need to have a short-term water supply for our family. That is one gallon of water per person per day for two weeks. But is that really enough? Step Four – Long-Term Water Storage. Water is essential and probably the most crucial aspect of surviving a disaster. Not only do we need it to drink to stay alive, but we…
Continue Reading LONG-TERM WATER AND FILTRATION PREPARING FOR EMERGENCIES